
Bees and Pollination
by Sherri Nichols
Want to know more about what YOU can do to save the bees? Click the link below, and again at end of this article, to read two additional bee-saving articles under the tab:
“Special Alerts and Warnings.”
What exactly is pollination?
 Pollination occurs when pollen grains from the male part (anther) of one flower are transferred to the female part (stigma) of another flower. Once this occurs, the fertilized flowers produce seeds which enable the associated plant to reproduce and/or form a fruit. Pollination can occur in ways other than by bees such as wind, bats, and other insects. However, bees are vital to our food source.
How do bees pollinate?
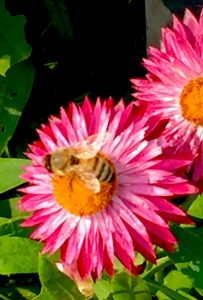
Bees have hairy legs; the fine hairs hold the pollen until the bee lands and a few bits are dislodged. Bees are attracted to open and easy to access flowers that smell sweet and are bright in color. On each trip, bees will only visit one type of flower, 50 to 100 flowers, all the same species, spreading pollen along the way.
But, there has been an alarming decline in pollinator numbers. Scientists believe bees are dying from the insecticides farmers use on crops. Fortunately, pollinating management is a growing career field. The biggest renters of bees are almond and blueberry farmers. These farmers pay to truck in hundreds of hives to pollinate their crops. But we need to do our part to save these critical pollinators by avoiding pesticides that reduce their numbers.
Interesting Facts About Bees
- Bees are fascinating! Before the female bee can forage at age 14 days, she has already performed several job descriptions. She has been a cleaner, an undertaker, a nurse, a builder, a temperature regulator, a guard and finally becomes a forager!
- Foragers leave the hive at sunrise and search up to five miles from their hive. They take up to ten trips a day and return at sunset. Bees sense of direction is driven by smell–the direction of the sun is also a factor. They also have tremendous visual skills; recognizing flowers and faces and can associate it with “good” or “bad.”
- They dance the WAGGLE DANCE. When the female bee returns to the hive, she shares her location, that is where she found plants to pollinate. She does this by performing a series of steps called the Waggle Dance. These moves tell the other bees the distance from the hive, how rich the food supply is, and the exact way to reach the food source. (To learn the specifics of how this works, click Waggle Dance above. It is really interesting!)
- To create one pound of honey, bees must visit two million flowers. A single hive can produce 60-100 lbs. of honey per year.
Now we need to do our part, fellow gardeners, to save these needed pollinators. Not only are bees fascinating, they and other pollinators are critical for our survival. Click here to learn the names of pesticides to avoid in your own yards: http://deerpathgardenclub.org/the-green-scene/
GARDENING IN DIFFERENT SHADES OF SHADE
by Bonita Friedland

Imagine your own shady glade, cool and tranquil, ever so lush, with greens of every depth and texture—a dash of pink, a wave of white, against a mossy wisp of verdant velvet! Imagine a feathered woodland path laced with blues and lavenders and little dots of yellow. Imagine awakening to a shade filled with so much more than Impatiens! (Remember that constant remark, “I have shade, so all I can have are Impatiens…” ?) There are literally hundreds of varieties of plant material exclusively reserved for varying degrees of shade. Certain perennials and evergreens, bulbs and annuals, are waiting to take root in your garden and transform that patch of “Buckthorn edged with the ever-reliant Patience Plant” into a deep and luscious room of knock-out beauty and tranquility.
Let’s separate shade into three distinct categories: FULL SHADE means perpetual shade caused by spreading evergreens, the north side of buildings or high walls, or low-branching or overhanging trees that cast deep shadows. LIGHT SHADE occurs under trees that allow the sun to filter through the leaves intermittently for no more than a total of two hours in the day, or on the north side of a very low wall, causing a light,airy and bright sort of shade. LIGHT SHADE is usually brightened by an adjacent area of bright strong light. HALF SHADE will contain three to five hours of sun—morning or afternoon—or a constant intermittent sun throughout the day. It usually occurs on the east or west side of a house, wall or hedge.
PERENNIALS for FULL SHADE include:
AMERICAN YEW (EVERGREEN SHRUB)
ENGLISH IVY (GROUND COVER, VINE)
WHITE FLOWERED PACHYSANDRA (GROUND COVER)
WILD GINGER
MONEYWORT
FERNS ( SUCH AS CHRISTMAS, OR CINNAMON OR MALE…)
MEADOW ANEMONE
TRILLIUM
BISHOPS WEED (GROUND COVER W/ LIGHT GREEN AND WHITE VARIEGATED LEAVES)
SHORTIA
BLUE, WHITE OR PURPLE FLOWERED AJUGA (GROUND COVER)
ANNUALS for FULL SHADE include:
JAPANESE AUCUBA
WAX AND TUBEROUS BEGONIAS (NEED AMPULE AIR CIRCULATION)
COLEUS
IMPATIENS
MONKEY FLOWER
PERRENNIALS for LIGHT SHADE include:
TIGER LILY
MOST FERNS
GROUND CEDAR
GROUND PINE
BLUE FLOWERED MONKSHOOD
RED OR YELLOW FLOWERED AMERICAN COLUMBINE
JACK-IN-THE-PULPIT (GREEN WITH PURPLE TINGES)
WHITE FLOWERED SWEET WOODRUFF
ROSE, LILAC, PURPLE OR WHITE FLOWERED BERGENIA
YELLOW FLOWERED SHOWY OX-EYE
PURPLISH BLUE FLOWERED CAMPANULA
LILY OF THE VALLEY
BUNCHBERRY
DUTCHMANS BREECHES
BARRENWORT
HOSTA
LOBELIA
LIGULARIA
WOODBINE
WILD MINT
PEPPERMINT
SPEARMINT
SCARLET OR PINK FOWERED MONARDA
BLUE OR LAVENDER WILD PHLOX
WHITE, LILAC OR ROSE PINK FLOWERED FALSE DRAGONHEAD
SOLOMON’S SEAL
BLUE AND VIOLET FLOWERED LUNGWORT
BLOODROOT
YELLOW FLOWERED STONECROP ACRE
WHITE FLOWERED SEDUM NEVIE
FOAM FLOWER
ANNUALS for LIGHT SHADE:
ALL BEGONIAS
FUCIA
ALL IMPATIENS
LUNARIA , VINCA ROSEA
PERENNIALS for HALF SHADE
LILIUM
ASTER
GOATSBEARD
ASTILBE
IRIS
BERGENIA
BRUNNERA
CAMPANULA CARPATICA
DELPHINIUM
LEOPARDS BANE
EUPHORBIA
HEMEROCALLIS (DAY LILY)
DAMES ROCKET
CORAL BELLS
EDGING CANDYTUFT
LAMIUM
JACOBS-LADDER
ARICULA PRIMROSE
SEDUM SPURIUM
LAMBS EAR
SPIDERWORT
ECHINACEA
CLEMATIS
ANNUALS for HALF SHADE
LOBELIA ERINUS
ORNAMENTAL PEPPER
BASIL AND MOST HERBS
PANSY
SPIDER FLOWER
ROCKET LARKSPUR
DAHLIA
CALIFORNIA POPPY
LISIANTHUS
ALL ANNUALS FOR LIGHT SHADE
LIGHT SHADE: Add varieties of shrubs in the RHODODENDRON AND AZALEA FAMILY, MOUNTAIN LAUREL, PRIVET, VIBURNUM, WEIGELA, ARBOR VITAE, YEW, HEMLOCK, WITCH HAZEL, DOGWOOD, HONEYSUCKLE AND JAPANESE MAPLE.
HALF SHADE: Add HYDRANGEA, MAGNOLIA, BARBERRY, BOXWOOD, EUONYMUS, HAWTHORNE, SERVICEBERRY AND COTTONEASTER
It’s Apple Season!
by Cheryl Buccelli
It’s apple season! If you’re from the Midwest, you’re probably nostalgic about apple season. It was a time to enjoy a trip to your local orchard with your family. With the growing interest in sustainability, many people are looking into cultivating apple trees on their own property. Fruit trees flower beautifully; they provide nutritious fruit, and offer haven to all sorts of creatures. Our local conditions are keenly suited to apple trees. Surprisingly a year old seedling can bear fruit in as little as three years. Apple trees can be planted from seed, but most people use a grafted tree. Grafting allows a much hardier root system to supply the tree, resulting in larger, higher quality apples. Grafting also allows the grower to dwarf the trees so apples are easier to pick. You may choose to purchase grafted trees, or graft your own. The Chicago Botanic Gardens offers a class on grafting in the spring.
There are a number of beautiful espalier apple trees in the Chicago Botanic Garden. Espalier have a great deal of ornamental value, they can also be space saving. If you prefer, go natural. Here we have an example of a non-dwarfed apple tree thriving in Lake Forest.
There are over 7,500 cultivars of the apple, there’s sure to be ones suited to your taste and location. Taking your time and doing your research will surely pay off. A wealth of information can be found on the Botanic Gardens website: https://chicagobotanic.org.
There isn’t a better way to enjoy the fruit of the season than harvested from your own backyard. Both for its beauty and functionality, an apple tree is a pretty sweet deal. Whether you grow your own, pick some at a local orchard, buy at a Farmers’ Market, or go to the store, try making an apple crisp. Here is a recipe to try.
Apple Crisp
Ingredients
6 tart cooking apples, peeled (4 cups
½ cup brown sugar
½ cup white sugar
½ cup all-purpose flour
¾ cup oats
1 stick of cold butter
¾ teaspoon ground cinnamon
1 tsp salt
dash of ground nutmeg
Directions
Pinch crumble together and sprinkle over apples in 9X12 inch pan
Bake uncovered at 350ºF for 30 minutes
Enjoy!
By Cheryl Buccelli
For a printable copy, click here: Apple Crisp, by Cheryl Buccelli
“Nighty-night, Sweet Woodruff!”
(Or, Putting Your Garden to Bed)
By Bonita Friedland
A friend of mine was lamenting the fact that her annuals looked too good to uproot in preparation for FALL. I assured her that my pink Begonias and blue Ageratums are staying in place until the FROST bites them badly!
It’s time, I fear, for our annual conundrum about the excitement we feel when we create the snappy look of AUTUMN. Part of us wants to create a new look to go with the crispness in the air, and the browns, reds and yellows of the leaves. The other part acknowledges the bitter truth: Summer’s pastel blooms never looked so good—if it weren’t for the color contrast! Patience, I say. In several weeks, the transformation will take place. Mother Nature will gently, but firmly, announce, “LIGHTS OUT…TIME FOR BED.” What to do?
STEP 1. DIVIDE AND CONQUER
Take a good look at your perennials. If those clumps of RUDBECKIA (Black-eyed Susan), HEMEROCALLIS (Daylily), and ECINACEA (Purple Coneflower), for example, have overpowered your garden, cut them in half—all the way downthrough the roots. Find another place in the yard for the new clone, or share with a friend. WATER GENEROUSLY, of course.
STEP 2. RESCUE THE ROSEMARY
Dig up and pot those tender herbs for kitchen use during the winter. Check for little critters before bringing in…
STEP 3. THINK SPRING
This starts indoors. Walk up to every window and take a look outside. Imagine the grays and browns of drab late WINTER day. Where would you like to see a splash of lusci ous color in this vista come SPRING? (When my daughter was young, I would send her out to place a stake where I finally decided was the exact spot should be. I would call out through the window, “…a little left…a little back…stop!” She marked the spot.)
Staking while your perennials are still intact will insure that you don’t disturb those roots when you plant the BULBS. Yes, BULBS!
Planting bulbs in large clumps produces a dramatic effect. Instructions for the depth and spacing of bulbs will come with the purchase. I like to dig a big hole, and arrange as many as possible at one digging. Tips up, of course…DAFFODILS ARE STILL ANIMAL PROOF. You might want to encase your TULIP bulbs in CHICKEN WIRE. Animals simply love to eat them underground, much to your shock come SPRING when the TULIP never emerges! Press the chicken wire in the hole. Cover with some soil and a sprinkling of BONE MEAL. Arrange the bulbs. Top with more chicken wire. Cover with soil, and of course, water. Animals will not enjoy biting through the wire to get at the bulbs, and the tulips will have no problem slipping through the wire holes. (NO GUARANTEES if you host deer, of course, who are not afraid to eat TULIPS!)
STEP 4. TIME FOR BED
Preparing your flower beds for winter’s harsh and direct sun and wind might require that you encase your BOXWOOD in a burlap wrap. (“CHICAGO BOXWOOD” is the best variety to grow around here, by the way.) Throw added soil at the base of your roses. Anti-desiccant sprays work well on your small evergreen plants to prevent loss of moisture. WATER YOUR GARDEN WELL THIS AUTUMN, in preparation for WINTER—especially BEFORE THE FIRST FROST. FALL CLEAN UP gets rid of a number of spores and eggs of pests that hibernate over the WINTER, waiting to infest the garden come SPRING.
After the FIRST FROST, pull out the ANNUALS and cut back the PERENNIALS to approx. 4 inches. ORNAMENTAL GRASSES, SEDUM and PURPLE CONEFLOWER can look stunning for WINTER INTEREST, so you might want to wait to cut them back in the SPRING. Rake all wet, matted down leaves out of the beds because they will discourage the proper air transfer to the soil. Then, run the lawn mower (or have your landscaper do it!) over the fallen leaves and distribute the shredded leaves over a top dressing of PEAT MOSS on the bed. Peat moss MUST be MOISTENED BEFORE APPLICATION as dry peat will form a barrier and prevent the soil from soaking moisture!
Come DECEMBER, you can further protect your beds with leftover boughs from your CHRISTMAS TREE and GARLANDS. This will protect against the heaving due to freezing and thawing and re-freezing. Remove the boughs in MARCH.
NOW TIPTOE AWAY FROM YOUR SLEEPING GARDEN, AND ALLOW IT TO DREAM OF SUMMER’S DELIGHTS, WHILE MOTHER NATURE DOES ITS JOB OF REPLENISHING.
For a Month-by-Month description of garden tasks, go to another page under our Garden Corner tab: http://deerpathgardenclub.org/month-month-gardening-tasks/
The Williamsburg Kissing Ball
Illustrations and Directions by Bonita Friedland
My last house had a front porch that simply demanded a hanging planter. Every SPRING I would stuff as many semi-shade loving specimens into the pot, along with every kind of tropical hanging vine I could find. For FALL, I replaced the annuals with chrysanthemums and aster, along with ornamental kales and long strands of Boston ivy. But bleak was my WINTER until I discovered the “Williamsburg Ball!” Known in Williamsburg, Virginia as the “kissing ball,” this hanging sphere radiates with variations of fresh evergreens, pinecones, and on occasion, fruits such as apples, limes, nuts, and pomegranates–whatever! Weatherproof ribbon adds the finishing touch.
One year, my Williamsburg Ball lasted well into SPRING. I had removed the red ribbons, but couldn’t bear to take down the still green ball. To our surprise, one day we noticed a little wren flying back and forth from the ball. Yes, there was a little nest inside the kissing ball! The ball soon began to turn rusty brown, but how could I remove it? I’m sure the neighbors wondered why this dead Christmas decoration was still hanging on the front porch!
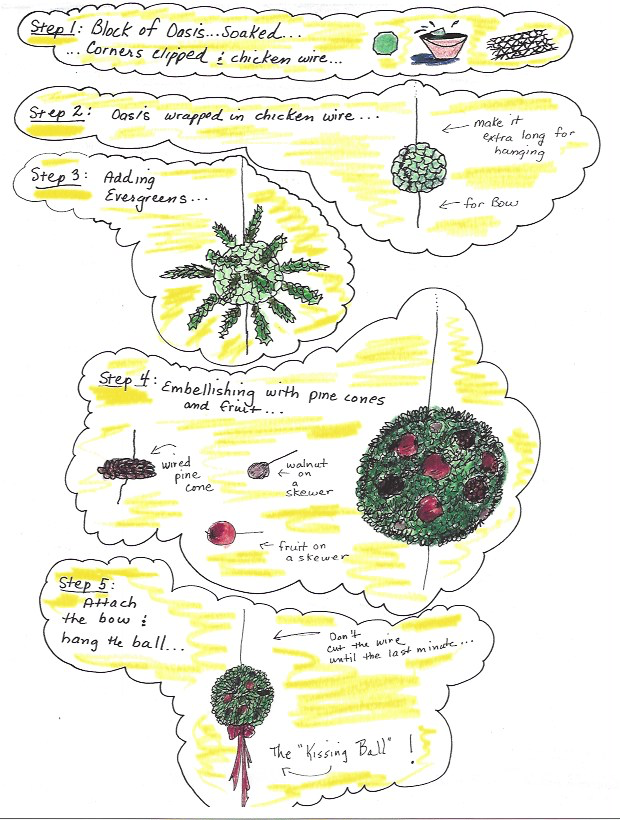
Step 1: To start your KISSING BALL base, you will need a block of OASIS (florist foam) and some CHICKEN WIRE. The OASIS should be roughly one-third the diameter of the finished ball, so a finished ball of 18” requires a 6” square of OASIS. Clip the sharp corners of the OASIS and soak it in water for 30 minutes.
Step 2: Take a flat piece of chicken wire and carefully form it around the soaked OASIS. Lock it together with pliers. The OASIS is fragile when wet, so handle with care. Add a long piece of wire to the top. This wire will be used to hang the ball while you work, so make it longer than you eventually will need. Find a place to work on your ball. I did it in my unfinished basement and tied it to one of the ceiling pipes. Keep it at eye level while you work. Now add another long wire to the bottom of the ball. (This wire will eventually hold the bow and ribbon strands, so make it long enough to allow for the branches that will be radiating from the base.)
Step 3: Assemble your various evergreens on a table under the hanging base: SPRUCE, YEW, BOXWOOD, HOLLY, BALSAM, PINE, etc. (Use pine sparingly, since it has a tendency to give the ball a “wild” appearance.) Cut your greens to approximately 8” and push the freshly cut end into the wet OASIS to a depth of 2 inches. Place one at the top of the ball, one on each side, and then one on the bottom. Then continue skipping all around the ball to keep it even, until no OASIS or CHICKEN WIRE can be seen. Periodically step back from the ball to monitor the shape, keeping it round.
Step 4: Now that you have an actual ball, you can embellish it with pinecones, bows, fruit, etc. To secure a pinecone, wrap a wire stick around the middle, making sure the wire is hidden under the appendages, and push it into the ball. To secure nuts, hot glue each walnut to a thick wooden skewer and push it into the ball. Keep the ball snug: the pinecone should not be sticking out, but part of the sphere. Apples, pears, pomegranates can be prepared with wooden skewers and pressed into the ball. Fruit will periodically need to be replenished when it starts to look bad.
Step 5: Attach a large bow with streamers to the bottom wire for a festive touch. Hang the ball in its final location, but before you cut the excess top wire, take a walk to the street to determine if you need to make adjustments in height.

For printable directions, click here: http://deerpathgardenclub.org/wp-content/uploads/2016/03/The-Williamsburg-Ball.pdf
The Scent-sational Coziness of Winter
by Bonita Friedland
You’re sitting by the fire, a mug of Paris Black Nespresso in  one hand, and reading material of all kinds in the other. On the table is a lovely two-month old orchid—still in bloom, of course. The snow has stopped, and that magical silence that it brings makes you look out the window and enjoy the shimmer of white. What could be more delectable?
How about adding a scrumptious little zap to your reverie? Something to rouse your little olfactory lobes and stir your penchant for all things GARDEN! Essential Oils, of course! On Mondays, the aroma could be ROSES. . . On Tuesday, it can be CARNATION. . . On Wednesday, GERANIUM. . .Thursday, VIOLET. . . Friday, LEMON BALM. . . Bathtime, NEROLI. . .Bedtime, LAVENDER. . .whatever you decide! AROMATHERAPY is the answer!
The term, AROMATHERAPY was first coined by a French chemist, Rene’-Maurice Gattefosse in 1928, but this method of breathing in the essence of flowers for enjoyment and medicinal value (…yes, we’ll get to the medicinal therapy later!) dates back thousands of years! In 2005, archaeologists discovered an Egyptian tomb containing a clay vessel that was tested to have stored a distillation of rosemary and lavender—4,000 years ago! (So if China claims to have been the first, then the start was even before that!)
The use of essential oils was extensive and varied. The Egyptian embalming recipe included CEDARWOOD, CLOVE, CINNAMON, NUTMEG and MYRRH. Egyptian men fragranced themselves by mixing their favorite essential oils in a fatty wax, and placing the solid cone result on the top of their head. As the day went by, it would melt and continue to emit a pleasing aroma. You can find the use of essential oils in Hippocrates’ “Tables of Medicine”. He claimed them for aromatic and medicinal value. In the 14th Century epidemic of the Black Plague, which killed millions, it was documented that those who used aromatics were able to survive unscathed!
Through the years, a number of oils were discovered to have antibacterial and antiviral properties. Some were used as sedatives: roman chamomile and lavender. The famous LISTERINE—AROUND FOR MORE THAN A CENTURY—invented to sterilize surgical equipment, contains microbial constituents found in eucalyptus, peppermint and thyme.
Gattefosse’s book on AROMATHERAPY is still in print since 1937, but there are countless articles on the web—as well as purveyors, and a great many other books published. More fireside reading!
Shall we get started? Go to a reputable store that sells AUTHENTIC ESSENTIAL OILS and don’t faint at the cost. They go a long way, and will keep in a cool place for a long time. DON’T get sidetracked by cheaper versions that are not the real thing, and DON’T ever buy oils that aren’t in darkened glass! And NO PLASTIC DROPPERS, please! You don’t have to go far, and if you don’t feel like ordering on line, I have found decent essential oils at Whole Foods and Heinen’s.
Two easy ways to scent your abode:
POTPOURRI
Find your bag of old, no-longer-fragrant- potpourri. (We gardeners never throw anything out) Revitalize it with your favorite essential oil. Put it in a glass bowl and mix. (Make use of your lovely crystal bowls! A never-used Waterford crystal wine cooler has become a lovely pot of fragrant potpourri! An odd-piece Baccarat wine glass can be a potpourri chalice! An odd-piece Rosenthal porcelain tea cup can grace a corner with fragrant petals!) When the scent wears away, you just drop more oils and mix, mix, mix! Ahhhhh!
ESSENTIAL OIL DIFFUSERS
Now this PREMIER METHOD is easy and effective: Picture a small device that looks like a little “Alexa” dome. You fill it with water up to the line, add three drops of your favorite essential oil, and replace the lid. Plug it in and turn it on. Instantly, a cool mist starts puffing through the opening on the top, scenting the air and sending you straight into the garden! Feeling a cold coming on? Add a few drops of Eucalyptus to help you breathe! Ahhhhh! The diffuser can go non stop for hours (depending on the device). I’ve seen Essential Oil Diffusers at Heinens, and I’ll bet you can find them at Target, Pharmacies, grocery stores and on line. Most diffusers come with recipe books…but creativity reigns supreme.
A FEW RECIPES USING AUTHENTIC ESSENTIAL OILS
TO GUARD AGAINST GERMS IN A ROOM:
Add to the diffuser: 3 drops of Tea Tree oil
2 drops of Rosemary oil
3 drops of lemon oil
TO DE-STRESS:
Add to the diffuser: 2 drops Cedarwood oil
2 drops Frankincense oil
2 drops Orange oil
4 drops Lavender oil
A short note about “carrier oils” is necessary here. A carrier oil is NEEDED if you are going to touch your skin with essential oils! Oils such as coconut, avocado, almond, to name a few, should be used in a mixture of 10 drops carrier oil to 1 drop of essential oil. So now you can try your recipes on yourself! For a stuffy nose, add 1 drop of Eucalyptus oil to 10 drops carrier oil, and pat your nostrils and neck—in addition to using a diffuser for the room!
So after a day of 2 drops of Grapefruit oil, 2 drops of Lemon oil, 2 drops of orange oil in the diffuser, you just might want to say that WINTER isn’t all that bad. It’s SCENT-SATIONAL!
Thank you to Sherri Nichols who found an excellent article about creating a bee house. Whether you make a bee house or would just enjoy reading about it, please click hereto read the article on the Chicago Botanic Garden site! Sherri is our own “busy bee!”
Summertime
by Sharon Twyman
George Gershwin’s “Summertime” aria from his opera “Porgy and Bess” tells us that in the summer the “livin’ is easy.” The lyrics don’t apply to all persons, and certainly not to home gardeners in the the Midwest who have lots of work to do during June, July and August. These are 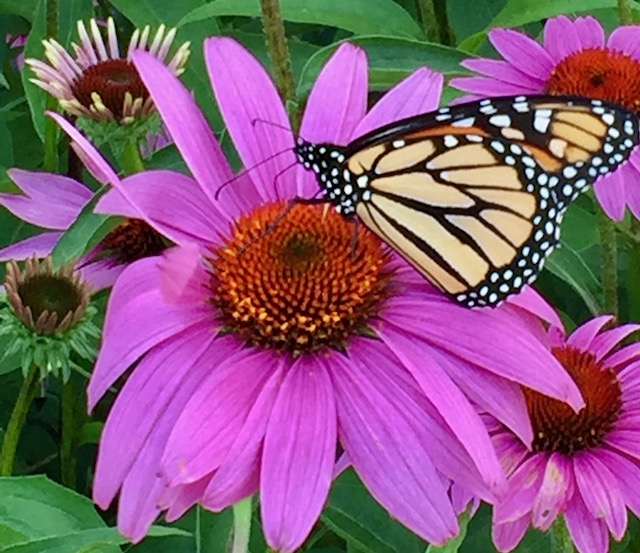 busy months for us, but two gardening tips may save time and keep our flowers blooming throughout the summer.
Deadheading is one useful practice for both annuals and perennials and simple to do. This is the removal of faded flowers from the summer plants. Essentially the gardener uses fingers or clippers to remove spent petals. These should be removed with the seed pod which may have formed below the flower on the stem. This will tell your plant that summer is not over and it has lots of time to bloom again before frost. This practice will extend your plant’s performance and beauty in your garden.
Hollyhock, Gladiola, Columbine, Bearded Iris, Marigold, Lobelia, Zinnia, Fuchsia and Delphinium are all plants that do well with deadheading. In fact, Delphinium will reflower in August and September if deadheaded after its early blooming.
Deadheading should allow many of our flowers to give us beautiful, bright colors all summer.
A second, easy tip to shorten summer garden work is to mulch. This, of course, means that our plants will be protected by natural items like pine bark, leaf mold or homemade compost. The more organic the better because as the summer progresses into fall these products will break down and continue to enrich the garden soil. Mulches give the garden plants a tidy appearance, reduce the need for frequent watering, prevent many pesky weeds from rising up from the surrounding soil and even keep some insects, like beetles, from attacking your flowers.
When you lay down mulch keep it about two inches away from the plant stems and use about two inches of depth of mulch to best help summer growth.
Please have a wonderful garden during your summertime.
Houseplants: How and Where They Like To Be
by Beth Teich
Last month, member Sharon Twyman shared an article from the Wall Street Journal by Brie Arthur, a certified horticulturalist. I have summarized the article for your convenience.
Brie says, “Plants have many excellent advantages, like turning carbon dioxide into oxygen, beautifying the environment and adding humidity to a home. Many plants sold for indoor growing are native to forests where they get very little light and experience little seasonal temperature change.”
That means that most houseplants don’t need to be drenched in sunlight, and could even do well in the warm glow of a light bulb! Plants that do well in low light are Spider Plants, Peace Lilies, Swiss Cheese Plants, and Pothos Vine. Most plants release oxygen during the day, but a few, such as orchids, bromeliads and succulents, release oxygen at night, which makes them great for the bedroom. Ferns are the choice for moist conditions in the bathroom, and those who travel often enjoy succulents for their home—no frequent watering needed.
Speaking of watering, too much moisture can cause mold and root rot, and is the cause of many plants dying. Drainage is important, so the pot needs to have holes that drain the water to another level—pebbles can be added to the lower level tray. Self-watering planters will also do the trick. To see if a plant needs to be watered, Brie suggests picking the pot up and feeling how heavy it is. After a while you will know when it feels light enough to need water. So, if you see leaves turning brown, you will need to decide if it’s because the plant was over-watered, or not watered enough!
Brie suggests cleaning the leaves with a damp cloth to remove dust and if fungus gnats appear, she sweeps them off the surface of the soil with her fingers, rather than using a pesticide that could bring unwanted toxins into the home.
Be sure to mark your calendar for our March 28th program at Chalet Nursery in Wilmette. Container garden expert and Manager of the Education Center, Jennifer Brennan will provide us information and inspire our indoor green thumbs in a most entertaining way. We have loved Jennifer’s talks in the past. This is sure to be a great presentation so bring your questions about houseplants and other gardening issues, along with a pen/pad to take notes.
Planting Bulbs
by Michele Montgomery
If you take some time to plant bulbs this fall, you will enjoy spring so much more as you wait for the first green shoots to poke through the soil. Soon you will have beautiful flowers to welcome the end of winter and the beginning of spring. While your yard may not look quite like this photo, you will have fun in two seasons–visiting a local nursery now to choose from the almost endless variety of colorful bulbs and enjoying the results in 5 or 6 months.
Here are some bulb planting tips to help you get started:
~Work compost, peat moss, or other organic matter into the garden bed before planting.
~Wait until the soil is cool to plant your bulbs–after the first hard frost.
~Place the “pointy” sides up.
~Plant in groups of at least 6-9 larger bulbs for great impact.
~Plant bulbs 2-3 times their vertical height deep.
~Check the label for spacing or plant the bulbs at least 2-3 times their diameter.
~Mix a low nitrogen slow-release fertilizer into the soil surface and water thoroughly.
Kale & Hearty
by Bonita Friedland
If you’re looking for something to boost your immune system, provide you with vitamins C, A, E and Folate, deliver minerals like calcium, potassium and magnesium, easy to grow, easy to harvest, then you’re looking for KALE in your garden! KALE , a relative of cabbage, can be planted in LATE SUMMER for a FALL crop.
Find an area in FULL SUN or even PARTIAL SHADE—placing the sprouted little plants in the ground or in a large pot, keeping the soil moist. Nurseries will carry the “seedlings,” which are 3 to 6 inches tall and ready to plant. For example, Etsy has an “Improved Siberian” KALE which is more cold tolerant than most, and will ship the little plants in 1 to 3 days. You can even find them on Amazon—just ask “Alexa!” Harvest when the leaves are about 8 inches high, and don’t worry about frost. Some say the frost makes them sweeter!
BONITA’S KALE SMOOTHIE
For a printable version of Bonita’s smoothie, click here:
Bonita’s Tasty Kale and Fruit Smoothie
I use the Ninja IQ and store my liquid kale concoction in glass drink containers with plastic lids that found at Williams Sonoma. I also don’t really measure my ingredients, so you’ll just have to look at the blender containers and stop the juices when you get to the max liquid level. Once you have the kale pulled off the stem and torn and placed in the blender, you can add whatever fits. Following is an approximation, and you will be able to add by looking at your blender container. Please forgive the lack of “amounts,” but playing around with this drink can be fun! You will come up with all kinds of different combinations once you start doing this! Just keep tasting!
- KALE, de-stemmed and torn
- 1 apple, cored, cut up but not peeled
- strawberries, de-stemmed—-about 7
- 1 small carrot
- raspberries —- about 7
- blueberries—-a handful
- prunes—about 6 (this is a sweetener and tastes good, too.)
- 1 lime, peeled and de-seeded (…or a lemon)
- flax powder—about 2 T
- beet powder—2 T (…like “Super Beets”…)
- Juices:
- MAIN JUICE IS ALOE VERA WILD BERRY from “Fruit of the Earth,” which can be purchased at Walgreens or Walmart.
- Add this first and then fill in with the other juices: Fresh squeezed orange juice (already squeezed at the store), cranberry juice (100% juice type), apple cider
- You can add whatever juices you like that are naturally sweetened.
ON HOT DAYS, I TAKE A SERVING OF THE CONCOCTION AND ADD A FEW SCOOPS OF ICE AND PUT IT ON “SUPER BLEND” FOR A COLD, REFRESHING, SHERBET THAT I EAT WITH A SPOON! JUST IMAGINE: KALE SHERBET!
P.S. Did I mention that KALE fights osteoporosis and heart disease? Who knew? And, because YOU grew it, there are a lot more nutrients and it’s so much fresher!
How, Why and When to Prune
by Bonita Friedland
Some kinds of shrubs need annual pruning to be kept in good condition. Dead, damaged or diseased growth must obviously be removed as soon as possible, but a good thinning is essential for the following reasons:
- maintain an aesthetic shape
- rejuvenate old age
- let in more air and sunlight
- increase the amount or size of blooms
- lessen the shock of transplanting
- prevent future trouble (wind breakage)
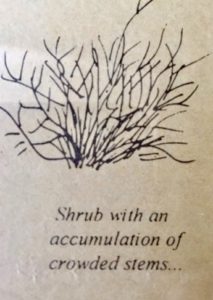 A late winter assessment of your property—without the encumbering leaves hiding the shape of each shrub—will determine which shrubs will need immediate attention.
The best time for pruning depends on the individual blooming habit of each plant:
A shrub which bears its blossoms on new growth in late spring or summer should be pruned in late winter or very early spring. This group includes: Barberry, Hydrangea, Privet, Honeysuckle, Rosa, Pussy Willow, and Spirea.
Shrubs which bear blossoms on last year’s wood should be pruned soon 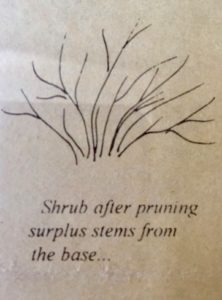 after blooming. This prevents the formation of seed pods, which rob the plant of its vitality. This group includes: Azalea, Forsythia, Magnolia, Climbing Roses, Spirea Bumalda, Viburnum Tomentosum, Cranberry Bush and Weigela.
Thoughtful pruning will enhance the look of your shrubs, and thus, the appearance of your landscape. Investment in a good pair of pruning shears is essential. I use the “bypass” blade for a good clean cut. A number of easy-to-follow books from the library,  or Google sites on pruning techniques will assist you. The general idea is to remove crowded, overlapping, surplus stems at the base of the plant. This procedure will maintain the natural shape of the shrub. For a good thinning, remove approximately one-fourth of the branches.
For further information, check out these sources:
A YouTube video clip: https://www.youtube.com/watch?v=fhEvf47Jqi8 and a good article: https://www.thespruce.com/pruning-shrubs-for-beginners-2132699
THE IMPORTANCE OF BEING AN INDOOR PLANT
by Bonita Friedland
Our gardens are sleeping comfortably under the frost and snow, patiently waiting for the time to burst forth in splendiferous energy. Each and every plant willing and able to provide luscious beauty come SPRING and SUMMER! Our spades and rakes, polished clean and sitting in wait in our sheds, remind us that all will be well outside when the time comes.
But we gardeners never sleep: The lure of green and the scent of soil cannot be on hiatus! What’s going on inside? Those of us who feel we need to get our fingers dirty, or at least catch a glimpse of flora in our bleak surroundings, can actually be of great service. The air inside is lethal, and our plants can and will come to the rescue!
Potted plants have been proven to improve air quality! Plants actually absorb toxins through their roots and leaves, and having them interspersed throughout your airtight house will clean the air and keep you well!
A few of the “top 10” potted plants that are proven to improve air quality are: philodendron, English ivy, peace lily, spider plant, aloe and snake plant. The American Chemical Society has researched and reviewed the data, and you can watch their brief but informative video: https://youtu.be/HdOibycDIA4.
This gardener is putting on her Uggs, placing a leashed Bunny in her purse, and heading for Pasquesi’s! I’ll enjoy their complementary coffee, let Bunny roam the floor, and my cart will be loaded with verdant and healthful goodies!
Happy “gardening!”
“May the Force be With You” Long Before Spring!
Article, photo and illustrations by Bonita Friedland
Imagine white NARCISSUS gracing the Christmas buffet table, HYACINTHS blooming in the kitchen on New Year’s Eve, pink TULIPS popping up in the foyer on Valentine’s Day.
No, you need not have a florist on retainer. In fact, with just a little timing and a minimum of care and cost, you can transform winter’s drab existence into something quite resembling the Chelsea Flower Show! Forcing bulbs for indoor joy is easy and the process is fun to watch. Instructions will vary depending on the bulbs you choose. Let’s start with NARCISSUS:
The easiest bulb to force is the PAPER WHITE NARCISSUS. It’s tender status requires no cooling period, so you simply gather your materials and plant. Begin with firm, unblemished, good-sized bulbs. A take-home instruction card is usually provided, which will indicate the length of time needed for blooming. Count back from the date you’ll want flowers to bloom, and you’ll know when to start. Since my instruction card indicates blooming will occur in 9 weeks, I’m starting my PAPER WHITES around December 12th in hopes of having blooms for Valentine’s Day.
- Use a shallow, watertight bowl or container—approximately 4 inches deep.
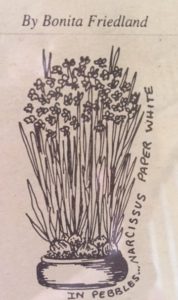
- Fill it with pebbles to about one-half inch below the top.
- Gently twist the bulb—pointed end up—into the pebbles, leaving three fourths of the bulb exposed.
- Plant your bulbs close together, but not quite touching. (A 7 inch container might hold approximately 6 PAPER WHITES.) Water to cover the base of the bulbs, and keep it replenished.
It’s fascinating to see the stems and leaves pop out of the bulb. Even if you miss your target date, the emerging shoots will still look attractive. A warm, sunny location will hasten blooming. To hold back a bloom, place the container in a cooler, not–so-sunny area. If stems get too long, and threaten to tip over, tie the plant at mid-section with a few strands of raffia.
Hardy bulbs, like TULIP and HYACINTH, require an extra step before youbegin. Since they need a cold period to encourage root devel opment ,
you must provide a “mock winter.” Some bulb producers suggest that you simply paper-bag the bulbs and refrigerate for 8 weeks before indoor planting. I have used this method with HYACINTH. HYACINTH will grow well in water alone. You can use a special forcing vase, or a small carafe with a wide top. I have a wonderful Italian jardinière, with six holes at the top. I fill it with water and place the pre-chilled bulbs over the holes. In a matter of days, I can lift the bulbs to see the developing roots! The HYACINTH fragrance begins long before the flower fully matures. Prepare for the intensity!
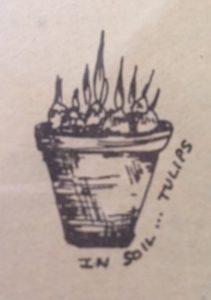 Choose early-flowering varieties of TULIPS for forcing. A planting mixture of equal parts of potting soil, sand, and moist peat moss is essential. Choose a container with drainage holes, tall enough to allow 2 inches below the bulb for root development, and enough space above to cover three fourths of the bulb.
- Start with an inch of small pebbles at the bottom of the pot. Follow with 2 inches of soil medium.
- Place the bulbs, pointed side up, into the pot. If you place the flat side of the bulb toward the outside of the container, the lowest leaves will drape over the edge nicely.
- Cover with soil, leaving one-fourth of the bulb exposed. Water thoroughly.
- Place the pot into a paper bag and then refrigerate—or place it in an unheated garage—for approx. 12 weeks, checking regularly to maintain moisture. When shoots emerge, the plant is usually ready.
- Lift and check the bulbs for a good root system. Transfer the plant to a cool, dark spot in the house for one week, then place it in a bright, sunny location to insure vibrant colored blooms.
Unfortunately, forced bulbs are so exhausted after blooming that they most likely refuse to bloom again! But before they head to that compost heap, they will have given you, your family and friends, quite a delightful show!
For a printable copy of these directions, click here: Step-by-Step How to Force Bulbs
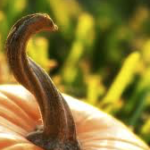
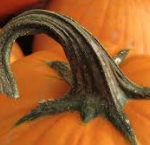
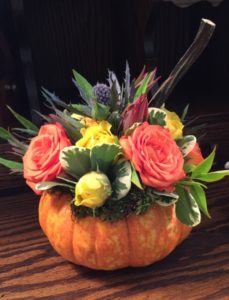
While I can’t take credit for this charming fall arrangement received as a gift from a dear friend, what made it especially clever was the use of the pumpkin stem inserted at a jaunty angle. If you make a Thanksgiving arrangement, try using the stem!
~~Judi Lindgren
Whimsy–The Sixth W!
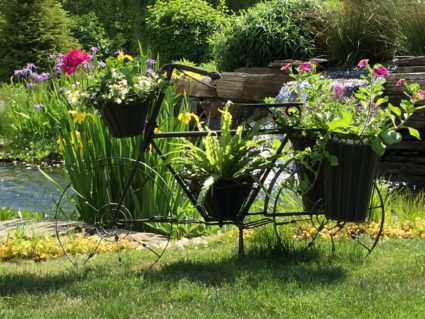
To get us started, the photo above is from Cindy Ramadan’s garden–both beautiful and whimsical! You get an A+, Cindy!
We all can name the five Ws: WHO, WHAT, WHERE, WHEN, and WHY. Gardeners may want to add a SIXTH W to their repertoire: WHIMSY!
The dictionary describes whimsy as playful, fanciful, an object with a sense of humor. Every gardener wants to create a lovely setting that is a source of pleasure and pride. With study, planning, shopping, and planting, the scene is created. But there is usually more. Either by
design or happenstance, we can add something of ourselves. This “something” is what makes a garden unique and how we often remember the gardens we visit.
One of the many pleasures I find when I visit gardens is this unique quality. Frequently I find it in whimsy. I love a touch of whimsy!
Whimsy comes in many forms and can enhance any garden, if not overdone. It isn’t always obvious and that can add to the enjoyment of a venue. I saw it during June’s Garden Walk at Louellen’s garden with a touch of red in every planting area and in her “man in the moon,” aka “The Head Gardner.” Brian assigned a name to his bonsai and in my garden, I have clay pot “people” and colorful birdhouses.
Whimsy can include kaleidoscope spinners, funky animal and globe sculptures, topiaries, bottle trees, mosaics, unusual bird baths, a secret room, and…well, you get the idea!
We all would love to have photos posted on our web site of members’ garden whimsies. As creative as this group is, I’m sure there are great examples that everyone would enjoy.
See you in the garden,
Connie Maines
Do deer invade your garden? While they look pretty and remind us how lucky we are to live surrounded by nature with acres of open lands nearby, no one wants deer to ruin their plants. Here is a recipe for home-made, natural, and inexpensive deer protection.
Recipe for Deer Protection
2 eggs
1 Tablespoon Tabasco
2 cups water
1-gallon sprayer
Mix eggs, Tabasco, and water in blender (or with a whisk but mix very well.) Then put mixture in a gallon sprayer and fill to the water line with more water.
Spray plants with mixture. There is no smell and no residue. Do this every 2-3 weeks.
by Connie Maines
BAKE THAT BOUNTY!
When your neighbor brings you a humongous zucchini, try making it into bread. Honest, it’s much better than carrot cake or banana bread!
ZUCCHINI BREAD
(Makes 2 loaves)
Preheat oven to 350o. Grease 2 pans heavily with butter.
Using a mixer, thoroughly combine the following ingredients in a large bowl:
- 2 cups granulated sugar
- 3 cups all-purpose flour
- 1 teaspoon salt
- 1 teaspoon baking soda
- 1/4 teaspoon double-acting baking powder
- 4 teaspoons ground cinnamon
Add the following and mix well:
- 1 cup vegetable oil
- 1 tablespoon vanilla flavoring/extract
- 1 tablespoon almond flavoring/extract
- 3 eggs
- 2 cups peeled, grated, raw zucchini
- OPTIONAL: 1 tablespoon fresh orange zest
Divide the batter into the two greased loaf pans. Bake in upper 1/2 of preheated 350o oven for 60 minutes, or until toothpick comes out clean.
Cool for 10-15 minutes with pans tipped to one side, then tip them to other side to cool for another 10-15 minutes. Loaves should then be able to be removed when pan is gently inverted. Let loaves continue to cool on one side — but they are delicious still warm!
Enjoy! And, thank Marge McClintock for the recipe!
Click here for a printable copy: Zucchini Bread
We may think “Irish” in the month of March, but if you’re thinking Irish gardens, you can visit these beautiful spots year-round.
Here’s a sampling of some you might enjoy:
- The National Botanic Gardens – Dublin
- Powerscourt, Enniskerry – Wicklow (about 35 minutes from Dublin)
- Mount Usher, Ashford – a short drive from Dublin
- Garinish Island Gardens, Bantry Bay – Cork
- Kylemore Abbey Walled Garden – Galway
Submitted by Nancy Stack